By Rob Potter

The only thing you can do is
To run away and keep running
Is it life? Is it death?
An unimaginable horror is about to begin.
Table of Contents
CHRIS’ INTRODUCTION
Hellnight (originally titled Dark Messiah in its native Japan) is a fantastic game, a horror gem for the original Playstation. Despite its quality, few people have heard of it, and even fewer have actually played the game through. Many of those who have played the game have found its maze-like layout and branching story line confusing, and I’ve been receiving requests for years for a proper walkthrough. After posting my review of Hellnight, Rob volunteered to write a walkthrough for the game in response to several readers complaining that they had never finished it. Well, not only did he write this walkthrough in less than a week, he provided annotated maps for every single area in the game. Basically, Rob didn’t just step up to the plate, he hit the ball out of the park.
Below you will find Rob’s complete walkthrough for Hellnight. While this walkthrough is quite detailed, Rob has designed it to be free of spoilers when read sequentially. This walkthrough is divided into sections based on save points throughout the game; each new section is preceded by a save point. Finally, it is important to note that Hellnight branches and changes depending on how you play. The character that you select for your partner has a particularly dramatic influence on the game. In this document Rob describes Hellnight as played with Naomi, but if you choose to let her die and select another person, your experience may differ from his.
Rob has graciously agreed to provide his contact information for people who would like to talk to him about this walkthrough. His e-mail address is RobPotter00 at hotmail.com. You can also contact me if you like.
–Chris
NOTES and TIPS
- It is very possible that the monster could appear in places that it didn’t for me. And if he does pop up in front of you, and I didn’t mention it in this walkthrough, you’re going to have to do some backtracking and looping to get around him on your own. I can’t help you there. But, I know there are some spots that he USUALLY appears, and I’ll cover those in this walkthrough.
- Be sure to check your map when the monster appears. You can track his movements by watching the icon representing him on the map. The icon representing the monster blinks yellow and red.
- Run into any room when the monster is chasing you. This will get rid of him or at least put some distance between you.
- There are many rooms to explore and people to talk to throughout the game, but in this walkthrough I will mostly visit and speak to those that are necessary to complete the game.
- This walkthrough is assuming you keep Naomi alive. If you let her die, things could change, so try to keep her alive for the purposes of this walkthrough.
Hopefully a future version on this walkthrough will contain sections for the characters other than Naomi.
- If there is an error in this walkthrough, or you find it difficult to follow, forgive me, it’s my first walkthrough. Contact Chris and ask him to make a correction.
- There are maps available as a companion to this guide. They are very helpful.
CONTROLS
L1: Strafe Left
L2: A quick look behind you.
R1: Strafe Right
R2: Use with directional buttons to look up or down, or anywhere else.
Start: Map – As you explore more areas, they are filled in on the map. Places you haven’t been yet are not displayed. Your character is the light blue blinking square icon. The monster is displayed as the yellow and red flashing square icon. Doors are displayed in red, gates are in green, and stairs are displayed in blue. Start can also skip cut-scenes.
Up: Move forward
Down: Move backward
Left: Turn left
Right: Turn Right
Triangle: Triangle can function as the “cancel” button. When in a room, pressing triangle will cancel out of an item choice and can be used to exit the room.
Triangle also brings up the map.
Square: Talk to your companion. In the case of this walkthrough, you’ll only be with Naomi, so pressing square will speak to Naomi.
Circle: Action button. The circle button can be used to perform actions, such as opening doors or using items. When the selector/cursor is on an item or object in a scene, you can press circle to bring up your inventory and then cycle through your items to choose an item and press X to use it on the object in the scene.
X: Holding down the X button allows you to run. However, running for to long will result in your character becoming out of breath. Your heart will begin to beat fast and the screen will shake. Running like this for too long will cause your character to become exhausted and eventually stop moving completely, so you should save running for when you really need it. You can also “tap” the X button. This will allow you to move faster, and while you’re not holding the button down, will result in less exhaustion of your character.
Also, when on the inventory screen, X is used to choose an item to use.
Select: Options.
CHARACTERS
Naomi Sugiura: Naomi is a schoolgirl that you meet on the train at the beginning of the game. For this walkthrough she will stay with you for the whole game.
Kyoji Kamiya: Kamiya is a serial killer that you meet at the bar Little Jamaica. You’ll see him a couple times throughout the game.
Leroy Ivanoff: Ivanoff is the Commander of “Organ,” a military group. You first see him near the train at the beginning and again later in the game. The monster killed his team and he wants revenge.
Rene Lorraine: A French journalist that appears throughout the game. She wants the scoop on the Holy Ring.
Ok, pick up your controller, let’s play!
HELL NIGHT
-The Research Facility in Ichigawa-
At second laboratory for special research, something escapes…
A cult called the Holy Ring is abducting people…
You head to the subway and hop on a train.
There’s an accident and the train stops.
After the intro video, Naomi and you have just ran into the nearest room with the monster following you.
MAINTENANCE ROOM
Check out the Machinery to find the COMPASS. Now check the CROWBAR and you’ll take it.
Check the floorboards to see that they’re locked with a padlock. Your newly acquired crowbar will take care of that. Press Circle to go to your inventory and press X to use the crowbar. You used the crowbar to smash the lock and a flight of stairs will be revealed beneath the floorboards.
Go in the Hole and head down the stairs.
Now you can save if you like.
UNDERGROUND SEWER
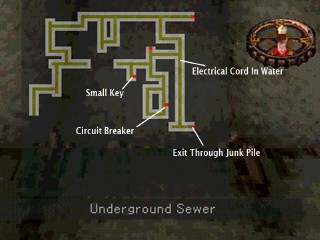
Click for a larger version.
You can talk to Naomi for a bit. Now we have to find a way back to the surface.
Follow the tunnel to the split and you’ll find the IRON CARD.
Go left (since your immediate right is a dead end) and you’ll walk down into some water. Head right and then take the first left.
Near where the tunnel turns, Naomi will stop you and let you know that the monster is behind you. When back in control, turn back around and run down the tunnel, going the only way you can go. Keep heading straight, take no turns.
You’ll head up some small stairs back onto the dry concrete. Head further down and turn right. You’ll see a shutter, and a switch next to it. Press circle while facing the switch.
There’s a Switch. Do you want to pull it? Yes, we do. Pull the switch. The shutter opens.
Head down the tunnel until you step back down into the water and you’ll see an electrical cord has fallen into the water. If you try to proceed you’ll get a shock. Now we have to find the circuit breaker to shut off the electricity so we can pass. Take the right that is next to you and head down the path.
There is a door to your right, but it’s only an empty maintenance room. No need to go there. So take the left, and then the immediate right. Take the next left and you’ll come to a door. It’s a maintenance room. You’ll find a key on the key holder. Take the key and exit the room.
Head back in the direction you came, taking a right. Take the next right as well.
Naomi will stop you and inform you that the monster is just around the corner waiting for you.
Turn around and run back, heading straight for the door at the end of this hall (the empty maintenance room I mentioned earlier). Go inside, then turn around and leave again. We’re just trying to lose the monster here.
The monster may be in the hall to your right, or heading there. Check your map to be sure.
When you’re sure he’s out of the way, run straight down the tunnel. Ignore the right turn (it just loops around) and go straight until you see double doors on your left. You’ll use the small key to unlock the double doors and head through.
Generator Room.
You can hear a low humming sound, as if a generator is running nearby somewhere. Naomi will say that there might be a switch to shut off the power somewhere in the room. She’s right! Select the Switchboard and you’ll see a lever. Select the Circuit Breaker to set the Switch to OFF. We’re all done here, the power is now off. Leave the room.
Now head back to where the electrical cord was hanging into the water (turn right out of the room, go straight, take the right). Be careful, the monster may be walking around the tunnels. Listen for his footsteps or breathing and check your map for him. If you do see him, stop moving until he leaves the area. When I play, he usually walks to the door to the empty maintenance room at the end of the hall. If he goes there, you can usually slip by him and run down the tunnel, taking the right to where the cord was and continue down the hall without him catching you.
Keep heading down the tunnel until reaching the spilt. Take the left and you’ll come to a large pile of junk blocking the pathway. Check out the gap between the rubble, and go through to the other side.
TOKYOMESH 1F
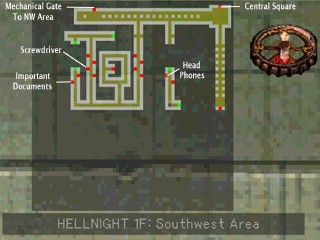
Southwest Area
Now there is another cut-scene where we are introduced to Razzo who tells us about the Mesh.
Now you can save your game again.
Still with me? Good. ^_^ Is Naomi ok? Ok.
You’ll hear an explosion and everything goes into lock down mode.
Welcome to TokyoMesh 1F Southwest Area.
Keep heading straight. You’ll talk to Kikuo. Keep heading straight. You’ll talk to Tachibana. Head straight to the double doors and go inside.
This is Central Square.
Talk to Brawny Tsuge who will tell you about everything being on lock down, and that the Mesh is divided up into three floors.
First Floor – Big City and Bar
Second Floor – Factory, Pens for Livestock, Production area.
Bottom Floor – Tsuge doesn’t even know what’s down there.
Now talk to strange Tsunoda who will tell you about a spirit that visited him and told him to find some important documents.
Talk to Sweeper Leno and he’ll tell you about some stairs in the Northwest area. Make sure you talk to Sweeper Leno! You’ll meet up with him later.
There’s also a tower door here, but we can’t get in this way. So let’s exit. Start to head right (west).
Onishi will talk to you and compliment your compass. Then he’ll tell you a little about the mesh. He says we’re in the Southwest Area, and there are three other areas on this floor, the Northwest, Northeast, and Southeast areas, Then he tells you to point your compass in the direction you want to go.
Let’s continue to the right (west).
Take the second pathway on the left side of the wall. If you try to take the first, Naomi will stop you and say there’s something horrible waiting there. Well, we don t want to run into that, so let’s take the second hallway down.
Continue straight down the hallway. There’s a gate on your left, and it’s tightly sealed. So keep heading down the hallway. The next door on your right is locked. The next door on your left is a residential room, with nothing out of the ordinary in it.
Take the next door on your right. In this room there is a dismantled machine and a screwdriver. Take the SCREWDRIVER and exit. The next door on your left is empty.
Continue down the hallway until it turns right. Keep heading down, ignoring the first right turn, and taking the second.
The first door on your right leads to Mole’s Appraisal Shop.
He’ll tell you what he knows about any of your items, so if you don’t know what an item is for, ask him.
There are a few of these shops throughout the game.
Exit, and continue up the hallway to the first door on your left. You’ll see a number 1 on the door. Head inside and you’ll see an Information Terminal. Select the Information Terminal and it will open up. Select the electronic display and you’ll see a spot for a card.
Remember that IRON CARD we found earlier? You can use it here. Press circle to go to your inventory and use the IRON CARD. This is basically a Map you can use to see what’s around you.
Exit and head back the way we came and take a right to explore this hallway further.
You’ll reach the end and turn right.
Continue up to the first door on your left.
Talk to Sergeant Okabe.
He’ll give you the IMPORTANT DOCUMENTS.
Sound familiar?
Now let’s backtrack to Central Square. Go through those double doors at the top right of our map. Select Strange Tsunoda and press circle to go to your inventory screen and use the IMPORTANT DOCUMENTS.
In exchange for the documents, Tsunoda will give you the MECHANIZED GATE KEY.
Exit the room and head right (west). Stick to the wall on your right and keep going straight. Eventually you’ll reach a large door with a device on it that looks similar to a clock. Try to open it and you’ll use the MECHANIZED GATE KEY. The door will open and we can save our game.
NORTHWEST AREA
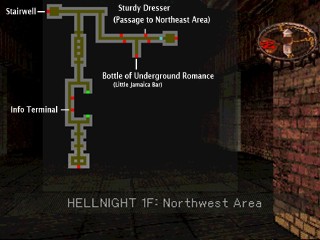
Northwest Area
Now we have reached the Northwest Area of TokyoMesh.
Keep heading straight (north) until the split. Take the left side and you all see a door to your right with a 2 on it. This is another Information Terminal, so you can check out the Map again.
Continue down the hall and take the first left.. Continue North until the split. Take a left and continue until you see big double doors.
We reached the Stairs! We can go home! Right? Wrong. When you try to go up the stairs, Naomi stops you. She doesn’t want to go there because something scares her about it. She wants to find another stairway, and I’m not gonna argue with her.
*NOTE* If you ignore her and try to go up the stairs anyway, the monster will jump down, push you down the stairs, and take Naomi away. Then you have to go back anyway and Razzo tells you to watch out for yourself. And then you are alone. I’m not sure what happens after, because I didn’t play the game this way. So for the rest of this walkthrough, I’m assuming you DIDN’T try to go up the stairs and lose Naomi.
So let’s go back. When it asks if you want to climb the stairs select no.
So head straight (east) down this hallway (ignore the first right turn) and the hall will turn right at the end. Continue and it will turn left. The first door on your left is locked, and through the door on your right, you can talk to Yamaoka. He’ll tell you about the bar. Take the next right and talk to the frightened man, who will say there s a serial killer in the bar. Well, let’s go to the bar!
Continue straight and open the door to Little Jamaica, the bar.
You’ll see a cut-scene and Kamiya, the serial killer, will walk over and talk to you. He mentions that he was on the subway at the beginning too, and confirms that he is Kyoji Kamiya, the famous serial killer. But he says he won’t kill you because you don’t look like prey.
Talk to Master Jake and he’ll give you a bottle of UNDERGROUND ROMANCE.
You can exit. Head back down the hall and take a right, and go in the first door on your left. Use your SCREWDRIVER on the STURDY DRESSER. Now you can move the DRESSER. Open and go through the door that was behind the dresser.
You’ll be in a dark passage. Follow it until you come to a door at the end. Go through and you’ll reach the Northeastern Residential Area. Go through the door in front of you and you’ll be in the NORTHEAST AREA.
You can take a right to find another Information Terminal (map) and a broken Mechanized Gate, or you can go ahead and head left (east).
The door on your left is locked.
Head down the hallway and take the right. Continue heading straight and you eventually talk to Sakaki, who talks about the monster.
The monster then jumps down in front of you, so turn around and run, taking the second path on your left. (The first is a locked shutter).
Run down the hall (skipping the doors) and then taking a right turn.
The path splits again. It doesn’t matter which path you take, because they lead to the same place. I suggest the right. Keep heading South. None of the rooms in the hall are useful, so continue down the hall. The path splits again. Take the right and follow the hall to the door at the end.
There are 4 wooden boxes in the room. Use the crowbar on WOODEN BOX 4 to get a bottle of TOKYO MESH VINTAGE. Exit and head back, going East. Head down to the end of this hall and you’ll reach another MECHANIZED GATE. (Big double door with a clock-like thing) Head through (using your MECHANIZED GATE KEY again) and you can save your game.
SOUTHEAST AREA.
Head left (east) down the hall. The monster will appear here, so turn around and run back to the gate we just came through, and open it again to go back to the NORTHEAST AREA. This will get rid of the monster from this area.
So, go back through the gate once again to the SOUTHEAST AREA and head left (east) down the hall once again.
You’ll see that the monster is now gone, and we can proceed.
*You probably could have ran around him if you’re quick, but this way will get rid of him completely for a while.
Continue down the hall and it will turn right. Keep going.
Eventually there will be a gray door on your left.
Inside the room you’ll see an old man sitting down.
Talk to Hiding Jinbei and then give him the bottle of TOKYO MESH VINTAGE.
Then he’ll lie down and let you use the door behind him.
Go through the door and you’ll be in another dark passage. Continue through the passage, sticking to the left wall until you reach a door at the end which leads to the Southwestern Residential Area. Go through the next door.
SOUTHWEST AREA
Look to your right and you’ll see a door on the left wall.
Go inside and you’ll see some headphones on the desk.
Take the OLD HEADPHONES and exit.
There’s nothing else here, so let’s backtrack through the dark passage to the room with the man we gave the bottle to.
You’ll see he s still passed out with the bottle in his hand. Exit the room.
SOUTHEAST AREA.
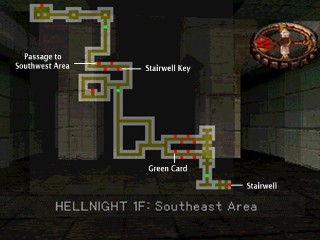
Southeast Area
Continue left (east) and on your right you’ll see a 4 on the door (another Information Terminal to look at the map).
In the next door down on the right, you’ll meet Looking Sugiya.
He wants to find his headphones.
Give him the headphones we just found and he’ll tell us the stairs are in the southeast corner of this area, and give us the STAIRWELL KEY.
He also mentions a guy named Tetsuo. Exit the room and continue down the hallway.
Take the first left. Continue south and take the next left. Follow the hallway to the split, and take a left. Take a right at the next split and go in the first door on your left to meet Pheromone Mayumi.Give her the bottle of UNDERGROUND ROMANCE and she’ll give you the GREEN CARD.
Now, the gate we need to pass through is on lock down, so we have to take care of that first. Which means we have to backtrack quite a bit. Head back all the way to the very top left of the map, to the MECHANIZED GATE that leads to the NORTHEAST AREA.
NORTHEAST AREA

Northeast Area
When you get back to the NORTHEAST AREA, head North, to the top right section of your map. To do this you head straight then turn left, take the first right, then three lefts, and a right.
*If the monster appears at anytime, find the nearest door and duck into it.
After exiting the room, the monster should be in a different area and out of your way.
Eventually you’ll come to double doors at the top right of the map. You’ll use the green card on it, and head through.
You’re in the CONTROL ROOM. Press the control switch. Pressing the control switch deactivates the security gates, so all of those locked gate will open now.
Exit the room and we have to go back to where we just were in the SOUTHEAST area, which means heading back south to the MECHANIZED GATE again. You can take the first left out of the control room this time, because the gate will slide open for you.
Get back to the MECHANIZED GATE at the bottom of the map and pass through to the SOUTHEAST AREA.
You can save again.
SOUTHEAST AREA
Ok, now that we’re back at the SOUTHEAST AREA, we need to get to the very bottom right of our map, so let’s keep heading south. When you reach the gate at the very bottom right of the map, you’ll find that it will now open up for us.
Head down the hallway to those big double doors. We’ve reached the Stairwell!
You’ll use the STAIRWELL KEY on the door and then we can head down the stairs. As Naomi points out, we’ll have to go down before we can get back up to the surface.
You can save here.
Welcome to the 2nd Floor of TokyoMesh, the RESIDENTIAL AREA!
RESIDENTIAL AREA
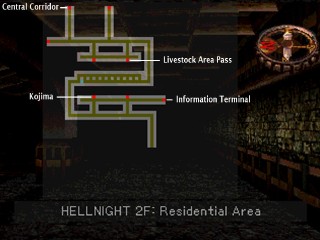
Residential Area
Guess who jumps down directly behind us? The monster!So run ahead straight down the hallway, then take the first right, which leads down the stairs, and head into the door directly in front of you down the stairs. There’s nothing out of the ordinary in this room, but it will manage to get the monster off our back for a little bit.
*The monster will be around a lot in the area, and I can’t predict exactly where when you play, so just make sure to avoid him by backtracking or going in doors.
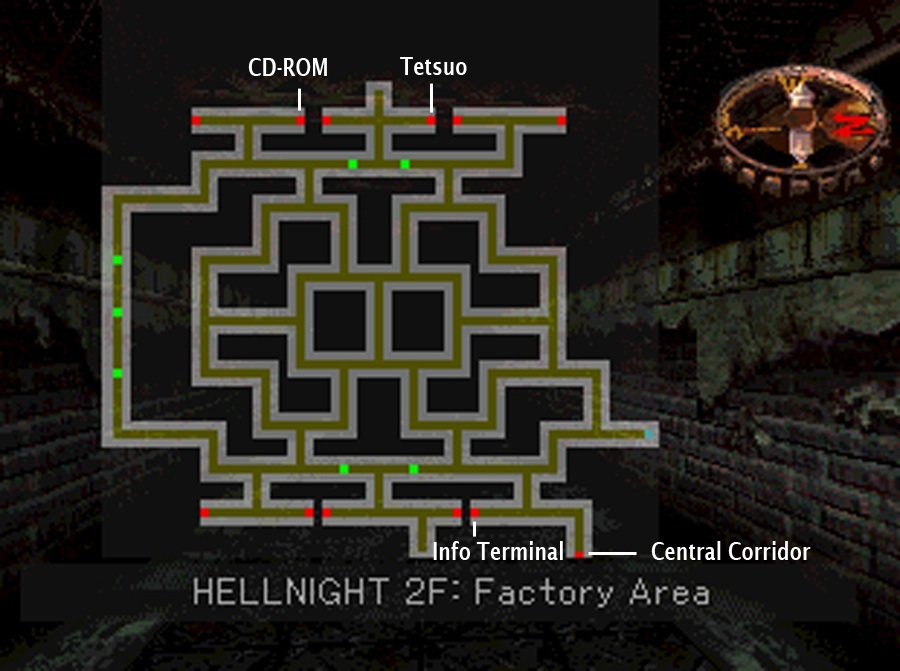
After exiting the room (facing the door) to the right/east the hallway leads to another Information Terminal, so you can see what’s around you. Let’s go ahead and check it out. There’s the Information Terminal, the Southern Residential Area, the Northern Residential Area, the Stairwell, and the Central Corridor.
Now exit and head back down the hallway, but be careful of the monster in the hall. Take the stairway on your first left back up to avoid the monster and turn right to continue down the hall. You’ll see a second set of stairs on your right, but we can ignore it for now and continue heading down the hall.
*The monster may appear ahead of you in this narrow hall, so if he does, keep backtracking and going in doors to lose him.
Once the hall turns right and opens up into the open area, stay to the left of the area where the floor is wooden, and run to the end and into the next hall that turns left. Continue down this hall until you’re headed west and see stairs on your left. Take the stairs down and head straight into the door in front of you. In this Office you’ll see a typewriter, a bookshelf, and a Pass. Take the LIVESTOCK AREA PASS and exit.
Head down the hall to your right and up the stairs to you right.
Continue down the hall to you left (west). Take the right turn and enter the door at the end of the hall.
This is the CENTRAL CORRIDOR. You can use this to travel from floor to floor in the Mesh. Select the Pass Scanner, and use the LIVESTOCK AREA PASS we found. The corridor will move and allow you to save.
LIVESTOCK AREA
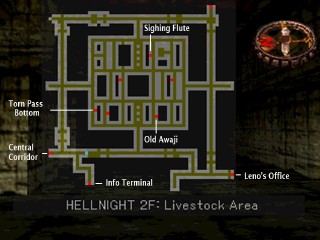
Livestock Area
Now we are in the LIVESTOCK AREA of TokyoMesh.
Moving forward you’ll talk to Miku, the scary little girl, and Bicky, her scary little bear.
*There are a lot of people we can talk to in this area, but there are only two places we really need to go. The other people will tell you that everyone is going to die, or tell you about an elevator that will take you to the surface.
Continue straight down the hall (ignoring the left) and take the first right. Head down the winding hall until you reach the next Information Terminal.
You’ll see the Central Corridor, which brought us here, this Information Terminal, the Central Livestock Area, the Northern Livestock Area, and the Southern Livestock Area. You can exit and head back down the winding corridor.
Take a right ignoring every turn (until the hallway itself turns right) then take a left and continue straight until you reach the door at the end (labeled Southern Livestock area on the Information Terminal).
Leno’s Office
Sweeper Leno will yell at you, then recognize you from Central Square.
He’ll then ask if you’ll help him find two thieves.
Say yes, and he’ll give you the RESEARCH AREA PASS.
*If he just yells at you and doesn’t say anything else, then you didn’t talk to him earlier in the Central Square, and you’ll have to go find and talk to “Old Awaji” who is in one of the rooms in this area, and then come back.
Exit the room and go back the way we came, taking the second right out of Leno’s office. Continue down the hall and take the first right. Take another right when it opens up, then take the first left. Ignore the door on your right and head up (north) until you see a door on your left. Go inside.
Talk to Believer Murami and he’ll ask you to answer some questions. Say yes, and then answer his 3 questions like this:
1. The White Crow
2. Adults
3. The Ocean
After answering correctly, he’ll give you the SIGHING FLUTE. Exit, and let’s head back to the CENTRAL CORRIDOR at the bottom left of our map. Use your RESEARCH AREA PASS on the pass scanner and you can save.
RESEARCH AREA
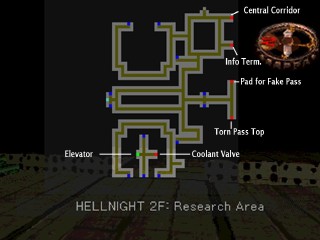
Research Area Lower Level
After exiting the Central Corridor, take the first left.
The monster will appear behind you. But don’t worry, take the first left and you’ll see a door with a 4 on it.
This is the Information Terminal of this area.
Let’s check it out.
So we have this Information Terminal, the Central Corridor, The Western Block, The Eastern Block, the Emergency Elevator, The Coolant Control Room, the Supply Room, The Control Room, Lab No. 1 and Lab No. 2. Let’s go to the Coolant Control Room.
Take a left after you exit, and then the next left and ignore the immediate right to continue heading south. Don’t turn anywhere, just keep heading straight down this path, south. Eventually the path with curl around and you’ll see a staircase leading up. Take it up.
Go down the path and it will turn right and you’ll see a staircase leading down on you right, skip it and go down the second set of stairs you see on your right. When you enter the area you’ll notice a locked gate to your left (the elevator is behind here, but we can’t get to it just yet because the power is locked down), a staircase straight ahead, and a door on your right.
Go in the door on your right.
It’s a Valve Room with cooling equipment. The Inflow Valve has been frozen, so we need to use our CROWBAR to break away the ice. Now we can turn the valve to stop the cold air from being released. Excellent! Now we can leave.
Now let’s go to the Supply Room. Take the stairs to your right upon exiting the Coolant Control room, and take the left at the split.
Take the first right you see, then take the next right as well.
Take a left at the next split.
Take a left at the next split again.<
Take the first right you see, then take the next right and you'll see a door, the door to the Supply Room.
[caption align="alignright" width="320"]
Research Area Upper Level
[/caption]
When entering the Supply Room you’ll view a cut scene. Ivanoff talks to you about the monster and then leaves.
Select the Wooden Box and use the SIGHING FLUTE. This will scare Miyake, who’s been hiding in the Wooden Box, into coming out. Leno will come get him and tell you to come by the office later.
Exit the Supply room, and head back the way we came, taking a left. Take the next left. Take the second right, which is a staircase leading down. Immediately after descending the stairs, take a left. Take a right at the split and enter the door at the end
In this Office a guy named Ohnishin might speak to you and you’ll see a pass, an old wooden box, and stacked documents. Take the TORN PASS TOP and exit.
For now we’ve got to go back to Leno’s Office in the Livestock Area, but after that we’ll come right back here. (Backtracking! >_<) So head back to the Central Corridor at the top right of our map.
*If the monster appears in your way, there are a lot of loops in this area you can use to run around him.
Once you get back to the Central Corridor you can save, and use the LIVESTOCK AREA PASS.
LIVESTOCK AREA
Once back at the LIVESTOCK AREA, head to Leno’s Office, by heading straight the entire way to the bottom right of our map. Talk to Leno and he’ll give you the RED CARD.
There’s one more thing we need to get in this area, so exit the room and take the second right. Go down the hall and take the first right, then take a left when it opens up.Take the third right down, and head up to the door on your right and head inside.
There s nothing in this Office except a trash bin. Check the trash bin to find the TORN PASS BOTTOM.
Now that we have the TORN PASS BOTTOM and the RED CARD, we can go back the RESEARCH AREA, so head back to the Central Corridor and use your RESEARCH AREA PASS.
Once exiting Central Corridor, take the first left. Take the second left you can, then take the second right. Continue down the path until it turns left, then take that immediate right, and you’ll see stairs to the left and right of you. Head straight ahead up the ramp and take a right at the split.
You’ll use the RED CARD we just got on the door. Press the control switch. Now exit and head back down the ramp.
Take the staircase to your right and continue down the path. Take the first right to go down the stairs. Walk to the gate on your right and it will open to reveal a door to the elevator. Can we leave now?! Nope, look at the switch box of the elevator, some jerk ripped it apart! Ok, let’s exit.
Take the staircase to your left back up and take a right at the split.
Continue down and take the second left, to go down the stairs.
Take the right after descending the stairs, and take a left in the hallway to the door at the end. In this office you’ll see a memo pad that could be used as a fake pass. Use your SCREWDRIVER on the pad, and you will poke holes in it to create a fake pass. Now that you have the FAKE PASS, we can go use it in the Central Corridor, so let’s head back up there.
When you get back up to the Central Corridor use your FAKE PASS (and save) and see where it takes you.
RESIDENTIAL AREA
Welcome back to the RESIDENTIAL AREA.
Head straight down the path and take a left at the split. Continue down the hall (ignore the turns) and it will turn right. Keep following the path through the open area, but look out for the monster. If he appears, try to run around him and dodge him. When you’re out of the open area with the columns, continue down the hall and head down the first small staircase on your left, and go through the door at the bottom.
You can talk to Nice Makihara and then use your CROWBAR on the dresser. Kojima will fall out. Leno will show up and take him away, and once again tell you to come by his office. Well, we’ve got nothing better to do, so let’s go there now.
Make your way back to the Central Corridor and use your LIVESTOCK AREA PASS and save.
LIVESTOCK AREA
When back at the Livestock Area, head back to Leno s Office (the room in the bottom right of the map).
Talk to Leno and he’ll give you the FACTORY AREA PASS. Well, what are you waiting for? Let’s go to the Central Corridor and use that FACTORY AREA PASS (and save).
FACTORY AREA

Factory Area
It’s a dark place with chain-link fences everywhere.
Continue straight down the path (ignoring the right turn for now) and you’ll come to another Information Terminal. Let’s check it out. In this area there’s this Information Terminal, the Central Corridor, the Supply Room (which is most of this area), the Northern Block, the Southern Block, and the Automated Factory.
Exit, and go down the hall and take the left down the small stairs. At the split, attempt to go right and the monster will jump down in front of you.
Turn around and head down this hall. Take the right (up the little stairs) and take a left at the split. Continue down the hall until you come to a moving conveyor belt heading to the right. Hop on and ride it to the end, then continue down the hall (ignore the right turn) and you’ll come to another moving conveyor belt. But this time, there will be a path to your right (north) in the middle of the conveyor belt, so stick to the right wall and be sure to run off, up the path.
In this hall there will be some random explosions (not sure what it’s about) but they won’t kill you, just slow you for a moment. So continue up the path, taking the small stairs up and take the first left. You’ll go down some small stairs and take a left at the split. You’ll approach a gate, but it will slide up for you. Take a right and take a right again when you see the big fan in front of you. Enter the door at the end. This is the Factory.
Talk to Robot Freak Tetsuo. He’ll mention Sugiya and his headphones and then agree to go try to fix the elevator’s switch box (located in the RESEARCH AREA). Exit the room and go back the way we came, down the little stairs. Take a right at the split and pass through the gate. Continue straight. You want to take the first right, but most likely the monster will jump right in front of you. If he does, backtrack a bit and wait, or go in a door.
*This was pretty difficult for me, as I wanted to keep Naomi alive, so prepare to do some re-loading of this level.
There is also another route you can take by heading back south, ad then going all the way around and up the path on the left of the map.
Eventually, you will be able to continue and take the right.
Take the right at the split and go in the door at the end.
The Warehouse. Talk to Soulful Tsutao and he’ll give you a CD-ROM. There’s nothing left to do here, so let’s run back to the Central Corridor at the bottom right of our map. Watch out for the monster.
Once back at the Central Corridor, use the RESEARCH AREA PASS and save.
RESEARCH AREA
We need to get to that elevator again. So head south. I’m going to assume you remember where the elevator is (the left side of that plus sign looking area at the bottom of your map).
When you reach the Elevator Room you’ll see Tetsuo. Talk to him and he’ll tell you that he thinks he got the switch fixed and you should be able to use the elevator.
Now we can get on the elevator! We can go home!
Get on. You’ll see a cut scene. Uh oh. The elevator fell! Looks like we won’t be going to the surface now after all.
You can save your game.
Now we are at: TokyoMesh 3rd Floor
OFFICER’S ROOMS
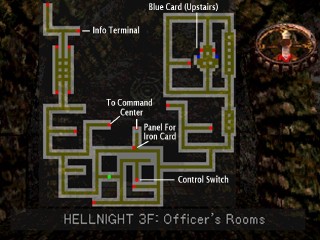
Officer’s Rooms
Continue down the path to the end and you’ll see a door leading to an Information Terminal. Let’s see what’s around us. This Information Terminal, the Emergency Elevator (which just fell), the Officer s Rooms Sections 1 and 2, Central Block, and the Control Room. Now you can exit, go down the hall and take the left.
A Holy Ring Member will jump out and try to bring you to be sacrificed! Then someone named Rene appears and knocks him out. Talk to Rene and she’ll tell you she’s a photo journalist and then she’ll leave.
Continue down the hall and when it opens up, the monster will jump down, but don’t worry, it’s an open area and you can run past him. Run to the left and head straight for the door.Inside you’ll talk to Believer Nekazu and it will get the monster off our backs.
You can exit and take a left, just around the corner to enter the hallway.
The left is a dead-end, so take a right.
The first left leads to Mole s Appraisal Shop, so if you want to go there you can, otherwise keep heading straight.
On the right is a locked gate, so continue down the hall.
*Sometimes the monster will appear here. If he does, backtrack and enter a door, or lure him back to the open area with the columns where you can run around him.
At the end of the hall you’ll come to a door, go inside.
You can save.
COMMAND CENTER
Go up the stairs. Going left or right here lead to the same place, so go either way. Head down the stairs and go through the door.
You can save here.
And we’re back at the OFFICER’S ROOMS
OFFICER’S ROOMS
Continue down the hall (ignore the left turn).
Ignore the right turn and continue down this hall.
You’ll come to an opening with pillars.
Take a left here and then take the first right.
You’ll come to a room with staircases on each side.
Go up the left staircase and enter the door at the top.
You’ll talk to Kiyama who will tell you that you are the key to the ceremony and that you shouldn’t go to the Great Hall, because that’s what they want you to do, and could lead to the apocalypse.
He also says there is an elevator that connects directly to the surface inside the monument in the Great Hall.
That’s where we’re going then!
He’ll also give you the BLUE CARD
Now we can head back the way we came.
Head back down the hallway we came through. Take a left, then a right, and pass back through the area with the pillars in the middle.
Follow the hallway and take the left turn.
The monster might appear here, so try to get around him somehow.
Take a left at the next split.
Follow this hallway until you reach a moving conveyor belt.
Take the first right after getting off of the conveyor belt.
Ignore the left turn and take the right turn further down.
Use your BLUE CARD on the door and you’ll enter the Control Room.
Press the Control Switch to deactivate the security alarm.
Exit.
Take a left at the split (heading back the way we came) then take a right and pass through the gate.
Take another right, then take a left.
You’ll see a stone wall blocking the way, and Naomi will point out that it looks like there s something here and
Turn around and look at the wall on your right.
At the corner you should see a panel with a card slot.
Select it (press circle) and you’ll use your iron card, which will raise some stairs behind you.
Go up the stairs and through the door.
You can save.
COMMAND CENTER
Head straight and go either left or right around the building in front of you (they both lead to the same place).
Find the steel door at the front of this building and head inside.
In this Command Center you’ll see a world map on the wall, a computer, and a central control panel with an ID Card Reader.
Select the computer and use the CD-ROM we have.
A roster of names will be listed, then you’ll stop reading.
Notice the ones in color: Roshiko, Nikkaku, and Sapon.
Now select the ID Card Slot 1 and use your RED CARD. Use your BLUE CARD on ID Card Slot 2, and your GREEN CARD on ID Card Slot 3.
After inserting all of the cards you’ll hear something sliding/opening/unlocking.
*To be honest, I have no idea how to actually solve this puzzle, but when I first played through, I saw the names in that order and thought Roshiko starts with an R, and so does red! So I used the red card first, but that doesn’t explain the other two. It might have something to do with the Japanese kanji on each card, but my Japanese isn’t good enough to understand them. Or it does have something to do with the names on the CD-ROM? I don’t know. >_<
Exit the room. And head forward to the door at the end. This is the Underground Capital South Station.
There's an old broken clock and a Mechanized Wicket. Head through the wicket to enter the station and you'll see a cut scene. You'll talk to Rene on the train and when you come to a stop you can save your game.
GREAT HALL
Continue forward past the ominous torches and you’ll reach a huge stone door blocking the way. Take a right and head to the end. It appears to be a dead end, but if you look at the wall on your left you’ll notice a big crack. Check it out, and it will ask you if you want to use this opening to enter the temple. Well, why not? Let’s do it.
We are now directly in the Great Hall. You can look at the Strange Stone, the Elevator Shaft (we have to get there!), and the Holy Ring Priest, then you’ll view a cut scene. Members of the Holy Ring start walking toward you and a big monster appears, but Rene jumps out and saves the day with her gun. Pretty cool! It ends with the place falling apart and everyone falling through the floor.
You can save.
You’ll talk to Razzo (who is now a ghost?) and then he’ll disappear. We must find the altar? Ok.
HIVE OUTSKIRTS
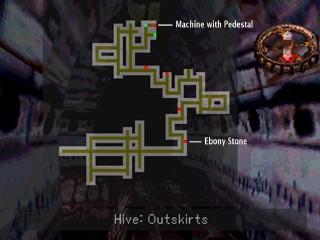
Hive Outskirts
This is a strange place.
Just head straight down the path without turning and you’ll eventually see another cut scene. Two monsters appear and fight. One of them uses it s light beam thing to defeat the other and then you’ll talk to That Which Wanders. He says the Hive is divided into separate sections that have different functions, and you can get around using warp points by using the Nexus Stones.
Looks like we’re not in Kansas anymore, huh Toto?
Continue forward down the hallway thing and you’ll come to a door on your right. Inside the Partition you’ll see a Giant Stone Pillar and an Ebony Stone. Take the EBONY STONE and exit.
You can skip the door on your left and continue until you reach an open area. There s a monster here on the left, so watch out!
Run to the right and then follow this path (ignore the first left)<
It will loop around allowing you to run to the right where the monster was standing, as he should have now moved. Take the left in this hall.
*The monster may try to follow you into this hall, so don't move too slowly.
To your right you'll see a conveyor belt thing, but it's moving in your direction, so continue down the hall. You'll eventually see a door straight ahead. Go inside and talk to That Which Consumes. He'll tell us we have to go to the Conversion Room. Let's exit and take the right.
You can ignore the door on your right (it s just another weird monster to talk to). Down the path on your right you'll see another conveyor belt thing on the floor. Get on the conveyor belt thing (for lack of a better term) and stay close to the wall on your right, because halfway down you want to take the path on the right (headed east).
*If you miss it the first time, don't worry. It loops around, so just take a couple lefts and you'll be back in no time.
You'll see the hallway is now a white and blue-ish color. Ignore the first door on your right and continue down the path. Go in the door at the end.
You'll see what appears to be a machine of some sort. Select the pedestal and use the EBONY STONE. The machine starts moving and then you can save.
REACTOR AREA

Reactor Area
*This is where the walkthrough might become confusing, and won’t be very easy for me to write because of all of the pathways and portals!
So bear with me, and I hope I can get you out of here.
The door directly in front of you is where we just came out of, so turn to your right (when facing the door) and let’s head east. Continue to the end of this path without turning (passing the door on your left) and walk into the portal (the rotating glowy thing). We’ve been transported to a new area.
Head straight down the path (it will curve to the left) and you’ll see another portal. Use it.
You might be facing a wall now, so to make sure we re in the same place, turn to face South.
Do you see a door in the distance? If you answered, “Yes, I do”, then great! We’re still together so far! If you answered, “No, I don’t!”, then we have separated and we’ll both surely die. Just kidding. If you happened to teleport to a different location than this, just check the maps and either get back on track or try to make your way to the Reactor Core by getting to the portal that leads to the core (refer to the Reactor Room map). There are about 12 portals in the area, so eventually you will make it there.
Assuming you DO see a door, you can ignore it. Let’s face the west and head down the hall.Take a left at the split and use the portal at the end of the hall.
We’re at a new place (if you check your map you’ll see 4 areas we’ve been). Don’t go straight, turn left and head west, because there s a monster in the path straight ahead. You’ll come to a door on you left, go inside. You’ll view a short cut scene of things hatching, and then want to leave the room.
Continue forward down the hall and use the portal at the end. Face east in the new area, and then go down the hall and take the first left. As you take the left, a monster will appear behind you, so be sure to move swiftly down the hall, take a right at the split and into the portal at the end.
In the new area you’ll see a door directly in front of you, head inside. In the hatchery, That Which Quivers will ask you to share your joy with it. Do it.
Exit the room and head back down the hall. Take a left at the split, then take the first right and go in the portal at the end. You’ll appear at an area that looks a little different, with a portal in front of you. Don’t go in the portal, instead turn around and walk the door on the other side to the south.
You’ll see a short cut scene. This is the Reactor Heart.
You’ll see the Reactor Room Core and the Vermillion Stone. Take the VERMILLION STONE and you’ll see another short scene.
Then you’ll hear the noise of a monster and exit the room. After exiting, head north, but beware, a monster has appeared here. Luckily, the pillar in the middle of this area will protect us somewhat, so you can slip around the monster. Start to go around the left side of the pillar in the middle, and when you see the monster headed your way, quickly run back around the right side and then head quickly into the portal to the north.
When you appear in the new area, head straight and go into the first door on the right. We’re back in the room with the machine. Let’s use the VERMILLION STONE we just found on the pedestal. The machine will do it’s thing and you can save.
DATA STORAGE ROOM

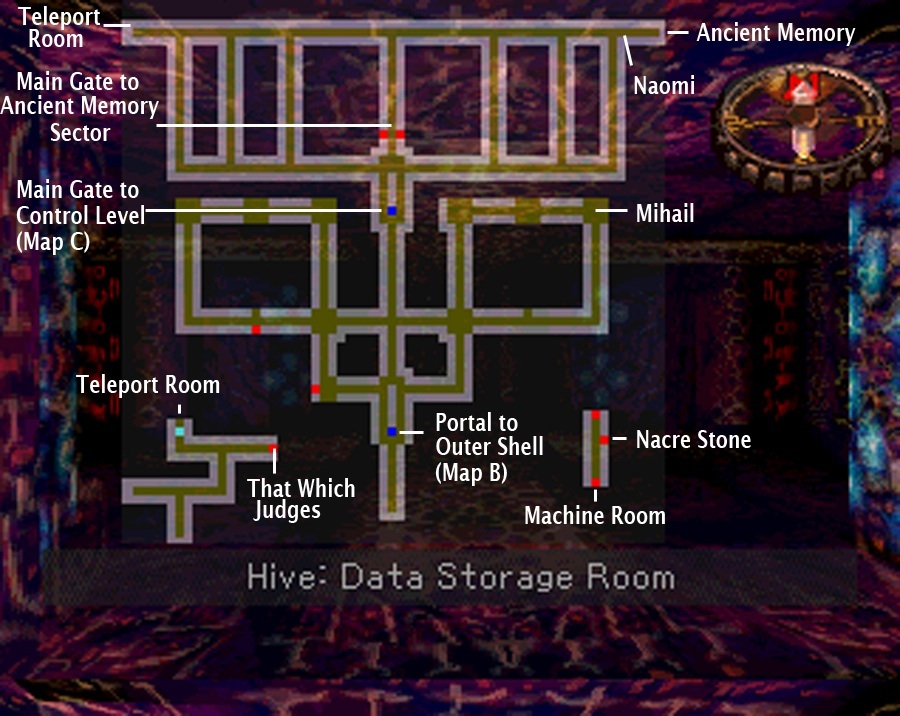
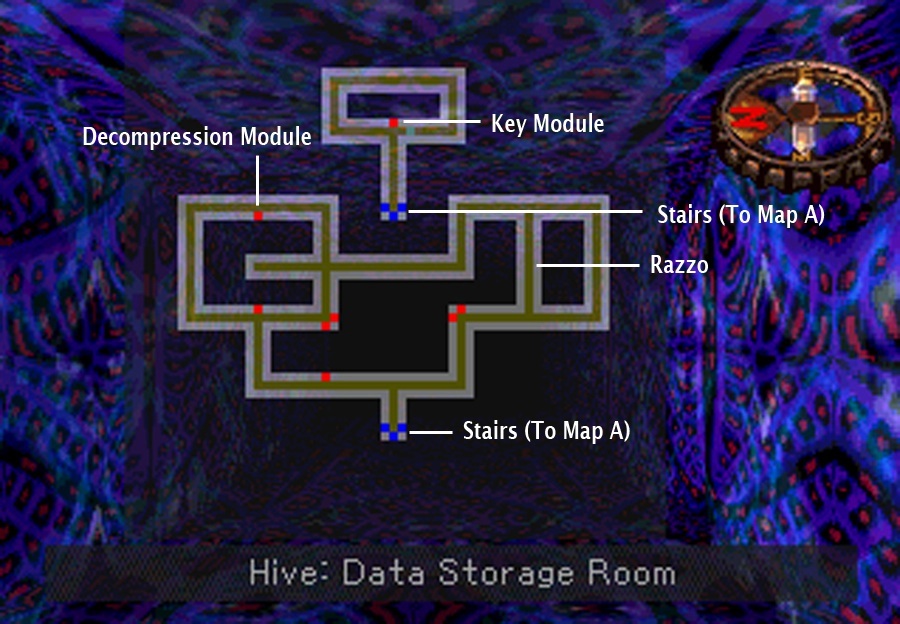
Data Storage Room Lower Level
*In this area, “Bio-Electrical Data Packets” are displayed in red on the map (as well as doors). The main gates to other levels are in green.
There’s nothing in the first door on your right, so head into the door at the end of the hall.
The Terminal. Select the terminal thing and it will do something.
And we’re in a new location. >_<
When you regain control, you'll notice that you can't talk to Naomi because you're all alone now.
Head down the hall and you'll be stopped by That Which Divides (red floating things). Halt!
It will screen you and come to the conclusion that you are prey; however your pattern is apparently similar to that of the old one. It then gives you minimum access clearance. Continue forward.
That weird light blue floating thing in front of you with the red (X) on it is actually a staircase type thing, but we don't have a high enough access clearance for it yet, so let's continue.
Take a left in this area and you'll see a gate (on the left). Press circle to head through. Follow the hall to the right and you'll talk to Mario. Take a left here and continue down this hallway.
Keep going and eventually you'll talk to Toru, who tells you that this place is full of the people the things have fed on over the years. He then tells you about a device that can help the people who have been compressed.
The hall continues to the right. Continue down the hall until you talk to Marudashi. He likes the place.
Continue down the hall to the south until Mario appears again. Take a left here to head east. Pass through the gate, and continue east, passing through the next gate.
Continue forward and Ogari will appear and talk to you. Continue straight ahead to the east.
Continue following this hall and you'll eventually talk to Mihail. He'll ask if he can come with you, inside you. I know, it sounds bad, but we can't leave him here. So let him, uh, join you. The screen will shake, and he'll thank you.
Continue west, to the left. You'll talk to Yuria, who says to go see That Which Reveals about the Bio Electrical Data Matrix. Continue west straight ahead.
Follow the hall until you talk to Ogari again. (There is a lot of looping going on here.)
Take a right, to head back to the center hallway on your map. Take a right and continue forward until you reach the room with the floating sphere thing with the red (X) on it (the main gate to the control level.) Walk around it, continuing forward until you see the yellow floating ball thing by the left wall. Walk up to it and press circle.
That Which Reveals will ask you if you desire to access the library data files. Say yes.
You can read about whatever you like here. This should give you some idea on what's going on. Maybe.
When you're done here, turn around and head south to the south entrance of this area, and talk to one of That Which Divides (red floating things) to have it screen you again. This time, it's screening will detect the presence of a new element in you (Mihail). This confuses it and grants you mid-level access clearance.
Continue south down the hall, ignoring the left and right turns, until you reach the area with the Portal to outer shell (that light blue circle thing with the red (X) on it). Walk up to it and press circle and it will scan you.
It will detect your mid-level status and open up the stairs for you.
[caption align="alignright" width="320"]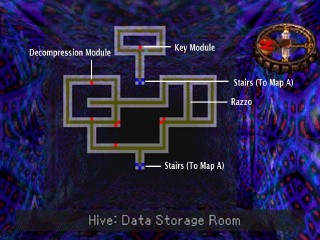
Data Storage Room Upper Level[/caption]
Head up the stairs and take a left. Follow this hallway until you’re headed north and reach a split. Take a left at the split and follow the path until you see one of those yellow floating ball things (Bio-Electrical Data Packet.)
Check the packet (circle) and you’ll find the DECOMPRESSION MODULE. Now we can decompress some people.
Continue east and you’ll come to a four-way split, take a left here. Continue down the path and take the first right you can. Heading down this hall you’ll bump into Razzo again. He’ll give you a copy of his bio-electric pattern. The next time we see That Which Divides we can be screened again and receive a higher access clearance.
Take a right at the end of the hall. You’ll come across two more yellow ball things (Bio-electrical Data Packets). The one on your right will allow you to access the library files, and the one in front of you contains nothing.
Continue down the hall to the left and let s take a left back down the stairs. Right at the bottom of the stairs, go up and talk to That Which Divides to be screened again. Now you’re granted High-Level Clearance.
Turn around to head north and take the first left. You’ll see a Bio-electrical data packet (yellow ball thing) ahead. Select it and you’ll use the Decompression Module. We freed someone; however, he didn’t want to be freed. -_-
Turn around and head back to the hallway in the center and take a left (head north). Continue forward until you reach the Main gate to the Control Level (light blue circle thing with red (X) on it). Let it scan you, and it will allow you to use the stairs.
Move forward atop the stairs and you’ll see a Bio-Electrical Data Packet to the north. Search it to receive the KEY MODULE. That’s all there is to do up here, so let’s head back down the stairs.
Descend the stairs and face North. Now continue north until you reach the gate blocking the way (the main gate to the Ancient Memory Sector). It will scan you and let you though.
Continue North and take a right at the split. Head all the way to the end, where you see a gate. Someone will appear when you approach the gate. You’ll use the Decompression Module.
It’s Naomi! You rescued her!I was scared we’d never find her again.
Ok, now we can pass through the gate. Let it scan you and walk into the room.
The Ancient Memory of the Hive will appear and speak to you. They will alter your pattern again and then disappear.
Are you supposed to be the Dark Messiah?? Impossible.
Exit the room and there will be an alert, and a monster will appear at the end of the hall. Run forward (to the west) and take the 5th left down (the hall to the left of the central hallway). Continue south and take a right at the split. Ignore the next right turn and stay on this hall.
Eventually you’ll reach the top left area of the map, take a left here into the room. When you run into the room you’ll automatically be teleported to a new location. Go straight and take a right at the split, then take a right at the next split.
Pass through the gate and into the room to talk to That Which Judges. It tells you it’s opened a pathway for you. Turn around and continue west. Take a right and pass through the gate. Upon entering the room you’ll be transported again.
Go into the door on your left. You’ll talk to That Which Judges and he’ll give you the NACRE STONE. Go in the door at the end of the hall and we’ll be back in the room with the machine. Use your newly acquired NACRE STONE on the pedestal.
You can save.
SOMEWHERE

What the?
You’re on train tracks. Walk forward and go in the door on your left.
The sewer again?
Take the first left down the hall and enter the door at the end. The priest will talk to you.
Exit and go back down the hall and take a left. Take the next right, and continue down the hall to the door at the end. Inside, you’ll talk to Kamiya.
After you exit, head back down the hall and take the next right. You’ll come to a four way, take a right here. You’ll soon come to another four way, take a right here and enter the door at the end to talk to the Apparition of Naomi.
When you exit, head back to the four way and take a right. Take a left at the split and continue to the door at the end. Inside, you’ll talk to a Holy Ring Acolyte.
After you exit, continue straight down the hall until you reach another four way. Take a left here and enter the door at the end to talk to Naomi’s mother.
After exiting, head back to the four way and continue straight (north). Take the next left and enter the door at the end. Inside you’ll talk to That Which Sways.
After you exit, head back down the hall and take a left to reach the next four way. Take a left at the next four way to reach yet another four way. (you should be facing west at this one). Go forward to the door at the end.
Inside you’ll talk to Rene. Poor Rene.
Exit and head back to the four way and go straight, headed east. When you step down into the water at the next four way, continue forward.
Continue down this hall to the door at the end. Inside Naomi will talk to her friends.
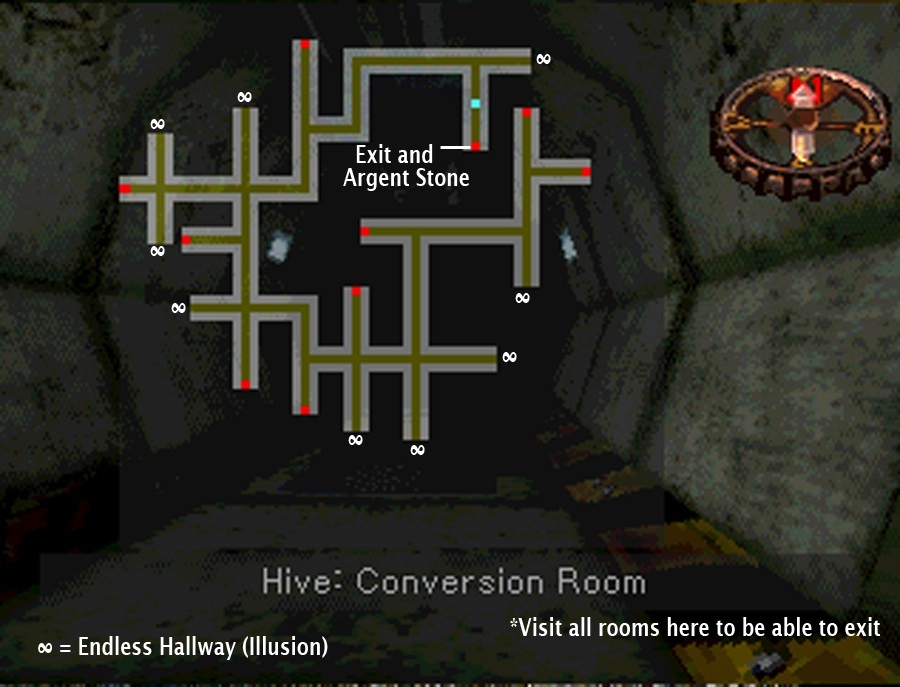
After exiting, go back down the hall and take the left. Take the next right and enter the door at the end. Inside you’ll talk to That Which Whispers, and he’ll give you the ARGENT STONE. You can now save.
*It wasn’t necessary to go in every door and speak to everyone in the area we just were to be able to exit, but it is necessary to speak to certain ones. If you don’t speak to certain people there, the last room wouldn’t contain That Which Whispers, instead it would contain a little girl version of Naomi and you wouldn’t be able to leave yet until you went back and spoke to those that are necessary. I’m not sure exactly which ones were necessary though, so it’s safer to just visit all of them.
SOMEWHERE ELSE
And we’re… back at the train tracks??!
We’ll, take the first door on the left again. The machine is in here now.
Let’s use the ARGENT STONE we just got on the pedestal.
The machine will do it’s thing and then you can save again. And we’ve finally reached the altar.
HIVE ALTAR

Hive Alter Lower Level
Continue forward until Razzo shows up and talks to you.
There’s only one direction to go here, so just keep moving forward through all of the gates until you reach the last one. After entering the gate at the end you’ll view a cut scene with some That Which’s. Then the Hybrid will talk to Naomi, and Razzo will send us to a new location.
*I die here more than anywhere else. Maybe it’s just me… Be careful of the monster here!
At the new location, continue forward and take the first left turn you can. Continue forward and you’ll step onto a moving conveyor belt thing on the ground, and make sure to stay to the wall on your left, because we’ll be jumping off to the left (west) halfway down this thing.
When you jump off to the left, go down the path and take the next right. At the end of this path you’ll come to a little ramp leading to a portal. Step into the portal.
After teleporting, head forward until you see a fire. Press circle in front of the fire to throw the VERMILLION STONE into it, and the flame will be extinguished.
One down, three to go.
Turn around and head back into the portal that brought us here.
Once teleporting back, continue forward and take the next right. You’ll reach another conveyor belt thing. Ride it to the end and then take a left.
This time take the conveyor belt thing all the way to the end. Continue down the path and take the next left. At the end of this path you’ll see another portal. Step into it.
You’ll be teleported to a blue-ish colored location. This area (and next areas) are just like the last, meaning the hallways and everything are set up in the same way.
*So, all 4 locations maps are the same!

Hive Alter Upper Level
Continue down the path and take the first left, but be careful, when you head down the ramp, the monster will be somewhere in front of you.
We’ll have to get by him. Turn around and head back to the split and take a left. Head down this path a little bit, but not too far, just enough to get ahead of the monster.
Stop and wait and you all eventually hear and see the monster turning around and retreating on your map. Make sure to go far enough that he doesn’t continue following you. Wait a second, and then head back that way, taking the right and head down that path. Make sure the monster is gone now and continue.
It’s tricky, but it’s the only way we can go.
*If he’s not gone, try heading even further away when he chases you, and then going back when he retreats. Eventually (it may take 2 or 3 times of retreating and going back) he will have moved and you can continue.
You can try heading straight down the path to the area at the end of the conveyor belt and hanging out for a while, then go back and see if he’s gone.
When he’s finally gone, further down the path you’ll reach the conveyor belts on the ground. Hop on and then take the path to the left halfway down (just like before).
*One time, as I was heading down the conveyor belt, the monster was at the end.
So be careful!
Continue down the path, take the next right, and step into the portal at the end. After you teleport, move forward to reach the fire and throw in the ARGENT STONE. That’s 2 out of 4.
Turn around and head back to the portal. After teleporting, head back down the path, take a right, and you’ll ride the conveyor to the end.
Now take a left and follow the path (up the ramp) to take the next left. Follow the path to the portal at the end. You’ll be teleported to a darker area. Continue down the path and take the first left. Continue to the conveyors on the ground and ride it halfway, and take the path to the left. (See a pattern emerging here?)
Take a right down this path and step into the portal at the end.
Head across to the flame and throw the EBONY STONE in.
3 out of 4! We can do this! Stay alive! (And keep Naomi alive. However, even if she dies you can still complete the game now and nothing will change except the ending, in which you’ll just leave alone. I suggest keeping Naomi alive.)
Turn around and head back to the portal.
Head back down the path and take a right.
Ride the conveyor to the end and take a left. Ride the next conveyor to the end and take the next left.
At the end of the path you’ll find another portal, step in.
You’ll be transported to a new area. Continue down the path and take the left. (Deja-vu?)
Head over to the conveyor thing and ride it halfway down, take the path on the left again. Follow the path and take the next right.
Go to the end and step into the portal.
Head across to the flame and throw in the NACRE STONE. You’ll view a short cut scene and return to the alter to talk to Razzo.
You did it!
Open the door and go through. The elevator heads upward.
You made it out!
Naomi thanks you and says not to tell anyone what happened, as they wouldn’t understand anyway.
Then you’re on your way home!
Hurray!
Congratulations, you’ve just beaten:
HELL NIGHT (DARK MESSIAH)
THE END
~Special Thanks~ to Chris from Chris’ Survival Horror Quest for introducing me to the game, as well as keeping me up to date with awesome survival horror news, as well as great articles on Japanese film and Creature Features.
http://www.dreamdawn.com/sh/

 I don’t really accept donations anymore–I haven’t for the past few years. Though I’ve been too lazy to remove the link, my collection of horror games has reached the point that the things I do not own are obscure or brand new, and either way I can buy them myself. But a few weeks ago I
  I finally finished


